Showing posts with label gluten-free. Show all posts

May 10, 2011

Delicious Gluten-free Banana Bread

Delightful gluten-free banana bread
 Banana Bread. Yum. Whoever invented banana bread deserves a medal, I am sure you agree. I love bananas. I eat them straight, or with peanut butter, or chocolate spread, or in a bread. It's an easy solution when one is low on sugar and is plenty good for you.

Don't be afraid to let your bananas develop those brown spots before you use them in baking! That is when their flavor is ripe and high. And making a double batch? -- always a very smart idea.

This loaf rises respectably high for a gluten-free quick bread.
This recipe comes from Elizabeth Barbone's Easy Gluten-Free Baking. It is simple and straight-forward, and very good. Some gluten-free banana bread tends to be sticky and dense, but not this one. Great flavor, wonderful texture, delectable crumb. No wonder Barbone calls this the "Blue Ribbon Banana Bread" (she adapted it from her mother's recipe, which won several blue ribbons in bake-off contests.) The only thing I did to this recipe was to add a handful of chocolate chips. And by a handful, I mean about 1/2 to 3/4 a cup, as desired. If I am using chocolate chips, I normally reduce the sugar by about 1/4 cup. It's your choice!


Blue Ribbon Banana Bread
Recipe from Easy Gluten-Free Baking

Wet ingredients:
  • 1 cup sugar
  • 1 1/3 cups very ripe mashed bananas
  • 1/2 cup (1 stick) butter, softened
  • 2 large eggs
Dry ingredients:
  • 1 2/3 cups white rice flour
  • 1/3 cup cornstarch
  • 1 tsp baking powder
  • 1 tsp baking soda
  • 1 tsp salt
  • 1/2 tsp xanthan gum
  • 1/2 - 3/4 cup chocolate chips (if desired)
  1. Preheat oven to 350F. Grease and rice flour a 9 by 5 inch loaf pan. in a small bowl, mix together sugar and mashed bananas. Allow to sit for 15 minutes.
  2. In a separate small bowl, whisk together dry ingredients.
  3. In a large bowl, cream butter until light and fluffy. Add eggs, one at a time, mixing well between additions. Add half of the dry ingredients. Blend until smooth on medium-low speed. Add banana-sugar mixture. Stir until well incorporated. Add remaining dry ingredients. Blend batter until smooth.
  4. Pour batter into prepared loaf pan. Bake for 50-60 minutes, until tester inserted in center of cake comes out clean.
  5. Place pan on wire rack to cool for 5 minutes (I tend to let it cool longer when the weather is warm). Remove loaf from pan and place on rack to cool completely.
 
Take time for yourself, and enjoy!

    April 28, 2011

    GF Crustless Quiche

    OK, for a while over here, it's going to be fast, delish and simple. No styling of food, just a photo (or three) to show you that I really did test out the recipe and did not die eating it, and that my family allowed me to post it.

    Fair deal? I hope so.

    Up today is a gluten-free Crustless Quiche recipe from Incredible Edible Gluten-Free Food for Kids: 150 Family-Tested Recipes. I love that it is fast and easy, and the possibilities are pretty endless. I used crumbled bacon in mine but you can use anything you fancy, including leftovers: roasted peppers, blanched broccoli, roasted asparagus, leeks and caramelized onions. Indeed if you vary the "filling" your family will not suspect that it is the same ol' recipe!

    The last piece, up for grabs.
    Gluten-free Crustless Quiche
     Serves 4-6, depending on appetite
    • 4 eggs
    • 1 1/2 cups milk or substitute
    • 3/4 cup sliced green onions (optional)
    • 1/4 tsp salt
    • 1/8 tsp ground pepper
    • 1/8 tsp grd nutmeg
    • 3/4 cup cooked, chopped meat (chicken, ham, crabmeat) OR 1/2 cup crumbled bacon OR anything you fancy!
    • 2 cups (about 6 oz) shredded cheese (Swiss, cheddar, Monterey Jack, Harvati)
    • 2 Tbsp sweet rice flour (I used almond meal)
     
    1. Preheat oven to 325F.
    2. Thoroughly grease a deep pie dish; set aside.
    3. In a bowl, combine the eggs, milk, green onions (if using), salt, pepper and nutmeg. Stir in the meat (or other filling of choice).
    4. Pull out the center rack of the preheated oven and place the prepared pie pan on it. Pour the mixture carefully into the pan. Carefully push the rack back into the oven and close.
    5. Bake for 40-45 minutes or until a knife inserted near the center comes out clean.
    6. Let stand for 10 minutes before serving.

    April 27, 2011

    Gluten-free Almond Flower Cookies

    I had planned to post a (very very good) brownie recipe but I am posting this recipe instead because I made these, brought it to park day and had other people tasted this (one boy, two other moms) and they wanted the recipe. I guess this means they are good! And yes, they are. They are very light, with a satisfying almond flavor to it, and if there is such a thing as a soft, comfy almond pillow, you are biting into one when you eat these. This recipe is low in sugar but big in flavor.


    This recipe comes from a new gluten-free cookbook I recently found at the library: The Ultimate Gluten-Free Cookie Book, and I am very excited about it. I love that she has a section just for egg-free cookies, and for you people out there who drool for Girl Scout cookies and the like, she has a section dedicated to "the fakes." Also, I love that you need not round up a variety of gluten-free flours to make her cookies-- basically, she uses either brown rice flour or sorghum flour.  And she has a nifty section right at the front explaining the science of how she arrived at this simplified way of gluten-free baking. And I love that. Simple is good. Actually, it is rather awesome. Ryberg has done all the research, studies and experiments, we just need to bake and enjoy, what's not to love?

    I do want to mention that this is the second recipe I have tried from her book, and because it turned out so wonderful and well-received I suspect there just may be a typo in the first recipe I tried, which is for the egg-free sugar cookies. I made those with the intention of gifting them to my friend K for her birthday, but they turned out rather salty, with a hint of bitterness to them. In fact, R asked if I had mistakenly used salt instead of sugar for those cookies (and I did not). I was rather disappointed, as the cookies looked so darn adorable and smelled mighty good while baking. If you attempt that particular recipe, you may want to reduce the baking powder to just 1 tsp instead of 1 Tbsp. I am really glad I decided to try another recipe in her book despite the first disappointment, can't wait to discover more yummy goods in this book!

    Gluten-free almond flower cookie

    Almond Flower Cookies (GF)
    Recipe from The Ultimate Gluten-Free Cookie Book 
    Makes about 25-28 cookies
    • 1/3 cup oil (I used expeller-pressed coconut oil)
    • 1/2 cup sugar
    • 1 cup brown rice flour
    • 2 eggs
    • 1/2 cup almond meal 
    • 1/4 tsp baking soda
    • 1 tsp baking powder
    • 1/2 tsp salt
    • 1 tsp xanthan gum
    • 1 tsp almond extract
    • 1/4 cup sliced almonds (optional, for decoration. I used slivered almonds instead)
    1. Preheat oven to 350F. Lightly grease a cookie sheet or line with parchment paper.
    2. In a medium-size bowl, combine the oil and sugar. Beat well. (I was able to do this in my stand-mixer. The trick is to not twist the paddle attachment to lock it in place. This way, when you raise the bowl up, the paddle drops down and reaches the bottom of the bowl.) Scrape down the sides of the mixing bowl at least once during mixing. Add remaining ingredients and mix well.
    3. Drop rounded spoonfuls of cookie dough onto the prepared pan. With moistened fingertips, press them to 1/4-inch thickness (I did this with a fork instead, moistening it with water each time). Arrange the almond slices (or slivers, if like me, you just want to use what you have on hand) on top into a flower or other nice pattern (or random pattern, like I did).
    4. Bake the cookies for 8-10 minutes, until there is the slightest hint of color; the tops will be dry. Let cool on wire racks before serving. 
    Er, I never said I am good at decorating!
      

    April 13, 2011

    Wacky Cupcakes (GF, egg-free)

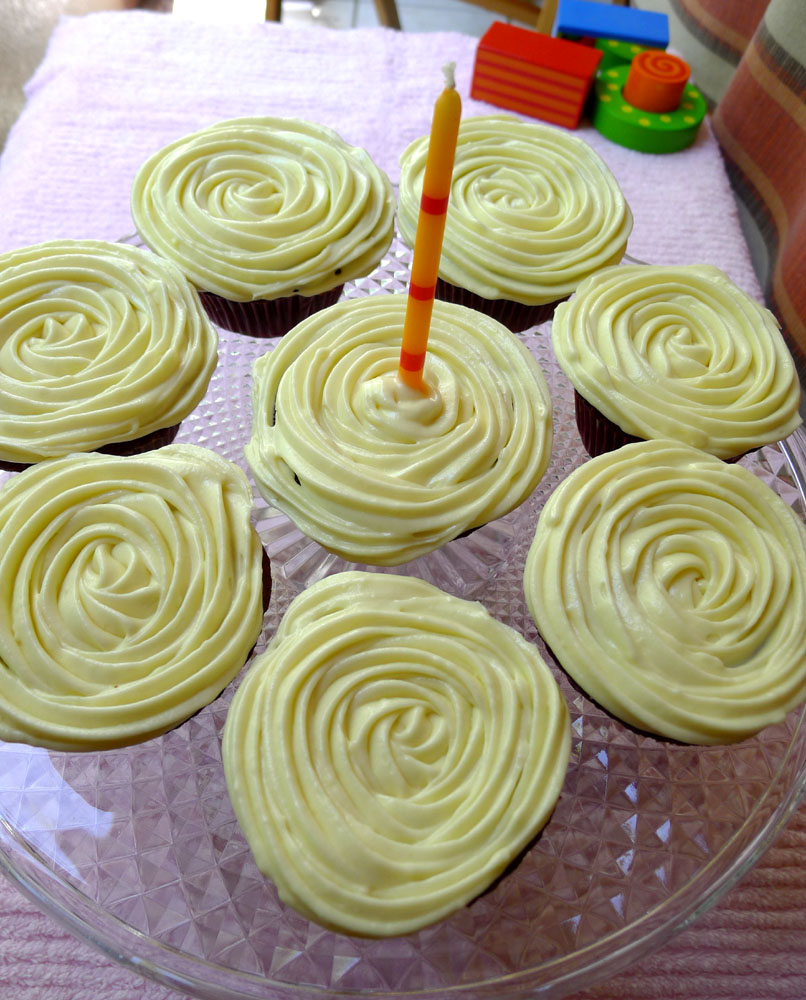
    Gluten-free, egg-free chocolate cupcakes with ivory frosting
    When my friend K's birthday was upcoming, I knew I wanted to bake her a cake she could enjoy without having to worry about allergens. I wanted to make it good, as I know the first birthday celebration without her dear mother will be tough. As I thumbed through the cookbooks my anxiety only raised as I did not really have time to test-drive the recipes and I did not want to serve her a mass of disaster in a bowl and hand her a spoon (even though she said that would be mighty fine by her).

    So, imagine my joy and relief when I saw Jeanne (over at Art of Gluten-free Baking) had not only made a wacky cake recipe (one of the recipes I pondered, wondering if it would work with a GF baking mix), she had one that she had made frequently. FABULOUS! I knew I need looked no further! That was the recipe I settled on, though I used Bob's Red Mill's all-purpose gluten-free flour-mix and added xanthan gum. I also decided to use the Dreamy Creamy White Chocolate Frosting from Rose's Heavenly Cakes to decorate the cupcakes, thinking a contrasting ivory topping will make them look fun. The other reason why I settled on this frosting was because it did not require additional sugar.

    I am happy to report that the birthday tea for K turned out really well this past Sunday, blessed with gluten-free, egg-free cupcakes that turned out delicious, with a dreamy frosting that was a cinch to make. I made the cupcakes and frosting together with V, making our "personal time" together all the more sweeter. And ever since I posted on Facebook this rose cake tutorial from i am baker, I had been dying to try it. I don't think my roses looked too shabby for a first try, don't you think? Of course, hers are far more superior, sniff~

    Gluten-free, egg-free Wacky Cupcakes
    original recipe from Art of Gluten-free Baking
    Makes 12 cupcakes or one 8-inch square cake
    • 1 1/2 cups Bob's Red Mill all-purpose gluten-free baking mix*
    • 3/4 tsp xanthan gum
    • 1 cup  granulated sugar
    • 3 Tbsp unsweetened cocoa, sifted
    • 1/2 tsp salt
    • 1 tsp baking soda
    • 1 tsp baking powder
    • 6 Tbsp rice bran oil (or other neutral-flavored vegetable oil)
    • 1 Tbsp apple cider vinegar
    • 1 tsp vanilla extract
    • 1 cup cold milk (or you can use cold water, or coffee)
    1. Pre-heat oven to 350F.
    2. Stir together dry ingredients in large mixing bowl (or you can do as Jeanne did, and do it directly in an 8" square cake pan. I used a mixing bowl since I was making cupcakes). 
    3. Make three depressions (or wells) in the flour mixture, 2 small and 1 large.
    4. Pour your oil into the biggest well, and the vanilla and vinegar into the 2 smaller wells.
    5. Pour the cold milk (or liquid of choice) over it all, and mix well gently.
    6. Portion batter (it's rather watery) out into the muffin tins. (I poured the batter into a large measuring cup and poured from there, much easier.) If you are using square pan just smooth out the top.
    7. Bake cupcakes for 30 minutes, until tester comes out clean. The square cake may need 5-10 minutes more, check with tester, which should come out clean. Let cool completely on wire rack. Frost if desired, and enjoy!
    * Scroll to the bottom of this page for alternative GF flour mixtures. There is a rice-free one, and another using bean flours.

    Dreamy Creamy White Chocolate Frosting
    Recipe from  Rose's Heavenly Cakes
    Makes 2 3/4 cups frosting, enough to frost 12 cupcakes
    • 9 oz white chocolate that contains cocoa butter
    • 12 oz cream cheese, softened but still cool (about 65F)
    • 6 Tbsp (3/4 stick) unsalted butter, softened but still cool (about 65F)
    • 1 1/2 Tbsp sour cream
    1. In a double-boiler, heat the white chocolate over hot, but not simmering water, stirring often (I used a bowl over a pot since I do not own a double boiler. You can also use the microwave but I do not recommend using one for health reasons.) The white chocolate should be almost completely melted when you remove it from the heat. Stir to completely melt the chocolate.
    2. Let white chocolate cool until no longer warm to the touch but is still fluid.
    3. In a food processor, process the cream cheese, unsalted butter and sour cream until smooth and creamy. Scrap down the sides then add the cooled melted white chocolate. Pulse until completely incorporated.
    4. Frosting will become more firm in the refrigerator.

    March 22, 2011

    Ugly but Good Chocolate Cookies

    This is possibly the ugliest cookie I've ever made. They looked like cow poop with mold growing on it.


    I am not trying to be rude here, just being honest with the first dismal thoughts that entered my head when I took the cookies out of the oven. Nevertheless, we let them cool, and tasted them and they were good. Chewy and fudgy, and the texture did not betray the presence of flaxseed meal. They are truly like bites of brownies. This is another cookie that I baked for my friend K. It is again from Elizabeth Gordon's "Allergy-free Desserts" and in her book she named them "Chocolate Crinkle Cookies." But as those of you on Facebook already know, these cookies did not look one bit like those shown in the photo in her book: even-sized, rather flat and perfectly round, with cracks on them that look like how a dry cracking ground does, during a drought.

    Maybe it's because I did not use palm fruit oil shortening as Gordon did. That was her replacement of choice for butter, but K is thankfully not allergic to dairy, and since I do not have any palm fruit oil shortening and am terribly in favor of butter, I used glorious yellow butter. Another thing I did different was to reduce the sugar a tad. I did not pack the light brown sugar and took out about 3 tablespoons of the granulated sugar. (I still find this cookie a touch too sweet for my taste, but I tend to not like my baked goods too sweet.) I found that the dough did not form into balls as easily as I thought they would, so I used fingers dusted with powdered sugar to form them into balls, then coat them with the powdered sugar, shaking off excess before placing them on the cookie sheet.

    The truth is, with familiarity (having looked at the cookies more than 24 hours now) and with repeated tasting, I have come to accept this cookie. I fondly call it "The Dark Horse," but here I shall call them "Ugly but Good Chocolate cookies." They are a great gluten-free, egg-free choice and I am glad they turned out delicious. I can imagine how hard it is to be on a restricted diet, and having something good and somewhat familiar to put into one's hungry belly is a blessing. It makes me grateful that we can eat almost anything in our household.

    So my friend M wisely told me to post a picture of the ugly cookie, as it would be a great life lesson to learn not to judge by looks. How true! I remember once I made a salad dressing with minced tomatoes and when I first poured it onto the salad leaves it looked like vomit to me. Maybe I have visual issues. But in any case, I am sure this example is not isolated, I am sure others have looked upon visually replusive food, and then tasted it to realize the virtue of its good taste. What is good for you may not look good either (example: kefir grains. But I won't tell you how I describe them, for otherwise this post will be composed of too many off-putting descriptions!).

    To play off the ugliness of the cookie, I chose a dainty plate with one of my favorites flowers -- the peony. I actually had fun photographing it. I hope this recipe gives some food for thought, and may come useful one day for someone yearning for some chocolate goodness with no allergens in it. Below is the original recipe, with my modifications in parenthesis.

    "Beauty and the Beast"


    Gordon's Chocolate Crinkle Cookies
    (hereby affectionately known as Ugly but Good GF, egg-free chocolate cookies)
    original recipe by Elizabeth Gordon, "Allergy-free desserts"
      Ingredients:
    • 6 tablespoons water
    • 2 tablespoons ground flaxseed meal
    • 1½ cups Bob’s Red Mill Gluten Free All-Purpose Baking Flour
    • 2/3 cup unsweetened cocoa powder
    • 1 teaspoon baking powder
    • 1 teaspoon baking soda
    • 1 teaspoon salt
    • 1 teaspoon xanthan gum
    • 1 cup organic palm fruit oil shortening (I used one cup butter, at room temperature)
    • ¾ cup packed dark brown sugar (I did not pack it in)
    • ¾ cup granulated sugar (used a bit less, probably 3 tablespoons less)
    • 1 teaspoon vanilla extract
    • ½ cup confectioners sugar, sifted
     
    Directions:
    1. Preheat the oven to 350°F and line 2 baking sheets with parchment paper.
    2. In a small bowl, combine the water and flaxseed meal and allow to thicken for 3 to 5 minutes. In a large bowl, whisk together the flour, cocoa, baking powder, baking soda, salt, and xanthan gum.
    3. In the bowl of a stand mixer, cream together the shortening (butter), brown sugar, and granulated sugar. Scrape down the sides of the bowl, add in the vanilla and the flaxseed meal mixture, and beat until it is fluffy and the flaxseed is thoroughly mixed in. Add in the flour mixture and mix the batter until thoroughly combined.
    4. Drop rounded tablespoonfuls of the dough into the confectioners sugar, rolling the cookies around to form balls. (If this does not work, dust fingers with powdered sugar, lightly form dough into balls and then roll in sugar.
    5. Place the balls 2 inches apart, to allow for spreading, on the prepared baking sheets. 
    6. Bake for 14 minutes or until the tops of the cookies no longer look wet (I baked both sheets at the same time, rotating about halfway through.)
    7.  Transfer the baking sheets from the oven to cooling racks and cool for 10 minutes, then transfer the cookies directly onto the racks to cool completely. 
    8. Store the cookies in an airtight container at room temperature for up to 5 days, or freeze for up to 3 months.
    Makes about 2 dozen cookies.


    March 20, 2011

    baking is an exercise

    I have quite some lemons from our lemon tree, and I also saw some delicious looking blueberries the other day and bought them. I thought I'd make some blueberry muffins (which always seem to call for lemon zest). Though the best blueberry muffin recipe have been found (look here, it is from America's Test Kitchen), and we all enjoy it very much, I still had to look for a new recipe to try. It is a very bad habit of mine, this need to try something new. I also wanted to try to make it gluten-free. We do not need to eat gluten-free, but from what I've read, I do feel it'd make good sense to not rely on gluten-laden goods all the time. Plus, I have friends who eat gluten-free and want to be able to offer something from time to time.

    I looked and looked and finally settled on this recipe I found at dinner with Julie. I used Bob's Red Mill all-purpose gluten-free mix, and sour cream instead of yogurt. I found it curious that the recipe stated that you should not beat the mixture in an electric mixer or the muffins will not rise, but then almost all muffin recipes I have made were mixed by hand. However, this one calls for butter and not oil. When I had the ingredients in the mixing bowl, I had no idea how I could "cream" them with a spatula. But then I remembered my Home Economics cooking classes from two decades ago! Oh, what memories! Paired by two's, our class of girls learned to bake and cook in a kitchen supervised by a very prim and proper teacher, whose dress is always starched, her hair each and every strand ever in place, and she would maintain a smile on her face even when she was angry at us. While we cooked she would walk around, chiding us for not wiping down the counter-tops right away, and muttering about the sinks being dirty. I was not her star student then, nope. But I remember this creaming method that she talked about. Using a wooden spoon or spatula, we scrapped (or smeared) the butter against the side of the bowl, scrap it up again, and continued with the smear and scrap movement.

    This smear-and-scrap movement seemed to be what that creaming is about. It takes arm strength. Every time I have to make a recipe like this (or whip up a small amount of egg whites or heavy cream in a bowl), I think of women in the pre-electricity day and their buffed arms -- that keeps me going as I try to hold back the tears. At least I exercised my arms while baking! Now that arm exercise does not stop with the creaming part. As you add the flour the batter gets really stiff and you will be kicking up your arm exercise a notch (no whining allowed). I was a bit alarmed at how the batter looked by the time it was almost done, as it very much resembled a bread dough and I was afraid the muffins will turn out tough. They turned out fluffy and had a nice chewiness to it. The girls enjoyed it very much and told me they could really taste the lemon in it too.

    Other things I will improve upon next time: smooth out the batter after placing them in the muffin cups. I didn't and though I don't mind a tousled look in my baked goods, this caused some of the parts to get overly brown.I will also watch it a bit closer, and check the muffins before 25 minutes. Because of the sugar topping, it can get burned and we had a few burned spots. Other than that, this is a yummy gluten-free recipe.


    Gluten-free Lemon Blueberry Muffins
    Adapted from dinner with Julie who adapted from Gluten Free Girl

    Ingredients: 
    • 10 Tbsp. butter, softened
    • 1 cup sugar
    • grated zest of a lemon
    • 2 large eggs
    • 3 cups Bob's Red Mill All-purpose gluten-free mix
    • 1 ½ tsp. baking powder
    • ½ tsp. baking soda
    • ½ tsp. salt
    • 1 ½ cups sour cream
    • 1 cup fresh blueberries (you can use frozen ones too, without thawing)
    • sugar for sprinkling
    Directions:
    1. Preheat the oven to 375F.
    2. In a large bowl, cream the butter, sugar and lemon zest together with a spatula. (smear the butter against the side of the bowl, scrap it up, and smear again, until everything is well-mixed and looks creamy. The sugar should have worked well into the butter.)
    3. Add the eggs one at a time, mixing after each.
    4. Add a cup of the flour along with the baking powder, soda and salt, and mix well. Add half the sour cream and stir until combined, then another third of the flour, the rest of the sour cream and the rest of the flour.Batter will be rather stiff!
    5. Fold in the blueberries.
    6. Divide the batter among muffin tins that have been lined with paper liners or sprayed with nonstick spray, filling them, and smoothing the tops, somehow. (You’ll get about 16-18 muffins.) Sprinkle the tops with sugar and bake for 25-30 minutes, until golden and springy to the touch.

    March 13, 2011

    Quest: the perfect brownies

    Actually, I've never tasted brownies until after we moved to the United States. And then I learned new things, and new words: cabinet, not cupboard. Cookies, not biscuits. Biscuits, not scones. Band-aid, not plaster. And so on. And I was introduced to brownies, the food. Dessert, they call it. Yum. I liked it, very much.

    When my firstborn was a little over a year old, we made a road trip to Santa Barbara to visit my professor from grad school. There, I tasted the perfect brownie, at a cafe that I can no longer recall the name of. It is odd, as we visited the cafe a couple times more during our trip (on top of that tacos place so loved by Julia Child), just to savor the brownie again. I know that after the trip I also talked about that brownie with a fellow mom online and she looked up a book she had containing recipes of famous dishes from Santa Barbara restaurants, but that brownie recipe was not in there. I even wrote the chef at the cafe, and she wrote me back a few months after, thanking me for my compliments but politely declining my request for their brownie recipe. She did promise that she would send me a copy of the recipe should they decide to go public with it.

    So I am waiting. For those dreamy, perfect brownies. A thin crust, just enough for you to experience the crispiness from being perfectly baked. Then a chewy, delicious chocolate layer beneath, with just the right touch of sweetness, held in balance by a slight hint of bitter chocolate. Those brownies were enjoyed with a wonderful cup of coffee, sitting out on a sunny and crowded patio.

    I cannot keep count how many brownie recipes I have made since, in those nine long years. Some were good, some mediocre, some failed. None were exactly like those Santa Barbara ones. Almost everyone, it seems, claims to have a perfect brownie recipe. I am just not finding it yet, but I am beginning to suspect that it is in my memory that its championship place had never been swayed. And that perhaps my tastebuds are just biased.

    Recently, I made two different recipes of brownies. One was adapted from Carole Walter's "best brownies" recipe, which my family thoroughly enjoyed. In fact, R felt those were the best and that I should stop hunting for more brownie recipes. The other is a gluten-free, egg-free version that I tried for my friend K. It uses flaxseed meal to replace the eggs, and I am not particularly thrilled with the results. The brownies had a good flavor, but a bit on the dry side, and kind of crumbly. K reported that they paired perfectly with vanilla ice-cream. She thought too the flavor was good, but the texture was not the chewiness that she enjoys in brownies. I am posting the recipe below in case anyone wants to try, or improve upon it, or make it using another egg replacement. Please report back if you do!

    (And also, I am trying to do better with my photos. It's a challenge, because I am rather impatient with the technical aspects of excellent photography, and also I feel the real test is in the eating, and I just want to get to the eating part quick quick quick! If you have useful tips for taking droolicious photos of food, I would love to hear!)

    I like to cut them bite size so I can keep popping them into my mouth!


     Almost-perfect brownies
    Adapted from Carole Walter's recipe

    • 1 cup unsalted butter
    • 5 oz bitterwseet (or dark) chocolate, coarsely chopped
    • 4 large eggs, at room temperature
    • 2 cups powdered sugar (sifted)
    • 1/4 tsp salt
    • 2 tsp vanilla extract
    • 1 cup plus 2 Tbsp all-purpose flour
    • 1 cup coarsely chopped pecans, toasted
    • 1 cup semi-sweet chocolate chips
    Directions: 
    1. Position rack in middle of oven and heat to 350F. Butter a 13" by 9" baking pan.
    2. Melt butter over low heat in a medium saucepan. When butter is almost melted, add the chopped chocolate. Remove from heat after one minute and let stand until chocolate is completely melted, stir occasionally.
    3. In a large mixing bowl, whisk the eggs lightly, then stir in sugar in a steady stream. Add the warm chocolate mixture, and stir lightly with whisk to blend. Mix in vanilla extract and salt.
    4. Sift the flour over the chocolate mixture in three additions, folding the flour gently in each time with the whisk. Whisk till flour is just incorporated. Fold in the nuts and the chocolate chips with a spatula.
    5. Immediately transfer batter to the baking pan, spreading evenly and smoothly the top with the back of a large spoon. Bake for 28 to 30 minutes, or until a toothpick inserted into the center comes out slightly moist, a few crumbs attached. DO NOT OVERBAKE.
    6. Cool brownies in pan on a wire rack for at least 4 hours before cutting. (Get out of the house if you cannot resist temptation! -- I did.)
    7. Store brownies in an air-tight container, up to 5 days. They can be frozen.

    Gluten-free, egg-free brownie
    Gluten-free Egg-free Fudgy Brownies
    Recipe taken from Elizabeth Gordon's "Allergy-free Desserts"

    • 3 tablespoons plus ½ cup freshly brewed espresso, cooled
    • 1 tablespoon ground flaxseed meal
    • 1¾ cups Bob’s Red Mill Gluten Free All-Purpose Baking Flour
    • 1 cup granulated sugar (I did find this recipe a tad sweet, you may want to reduce the sugar a tiny bit)
    • ½ cup unsweetened cocoa powder
    • 2½ teaspoons baking powder
    • 1 teaspoon baking soda
    • 1 teaspoon salt
    • ¼ teaspoon xanthan gum
    • ½ cup canola oil (I used melted coconut oil)
    • 1 teaspoon vanilla extract
    • ½ cup gluten-, soy-, dairy-, egg-, and nut-free semisweet chocolate chips (I added a handful more, it didn't seem enough! :-) )

    Directions

    1. Preheat the oven to 350°F and lightly grease a 9-inch round cake pan with oil.
    2. In a small bowl, combine 3 tablespoons of the espresso and the flaxseed meal and allow to thicken for 3 to 5 minutes.
    3. In another small bowl, whisk together the flour, sugar, cocoa powder, baking powder, baking soda, salt, and xanthan gum. Pour in the cconut oil, vanilla, and the remaining ½ cup of espresso. Stir with a wooden spoon until thoroughly combined and smooth. Fold in the chocolate chips.
    4. Pour the batter into the prepared pan and bake for 40 minutes, or until the brownies are firm and a toothpick inserted in the center comes out clean. Let the brownies cool completely in the pan on a rack before cutting them into triangles.
    5. Store the brownies, tightly wrapped and refrigerated, for up to 5 days.
    The batter before being sent into the oven, yum!


    March 9, 2011

    "We'll help you eat it all!"


    Some weeks ago I made a delicious Banana Coconut Cake from a recipe that I found on Tropical Traditions. I thought it was good, but could be better. So I decided to tweak it, making it gluten-free and replacing the icing in the original recipe with a chocolate almond ganache filling. And after a day’s work, I was very pleased with the results, and was over the moon when my girls were ooohing and aaahing over the cake. I wiped down the counter-top and cut a good chunk of the cake to give to my friend K, who cannot eat wheat for now. I heard V exclaiming, “And this is gluten-free mom! And it’s so good!”

    And I almost burst through the roof, all pumped up with pride.

    Then V asked, “And there are no eggs either, mom?”

    That’s when the roof came crashing down, and my pride, well, I think it went down the garbage disposal.

    I had totally forgotten about the eggs!! I was so focused on the wheat I forgot about the eggs!!

    You have no idea how sad I was, for it was a good cake. I could not tell K I forgot the other half of her allergy and give her half the cake. As I was banging my head against my very clean counter-top, I heard V pipe up: “Don’t worry, mom! We’ll help you finish it all up!”

    Isn’t it sweet? And funny?! – I was not worried that the cake would not get eaten up, I was just agonized that I forgot to replace the eggs with something else! Such things take practice, I suppose. I am pretty sure the way this cake is made, the eggs can be easily replaced with applesauce, but I am no expert. What are your favorite ways to replace eggs in a cake recipe?? All ideas and suggestions much appreciated!

    And below, the gluten-free but not egg-free banana coconut cake recipe. If you manage to make this egg-free, I would love to hear!!


    Gluten-free Banana Coconut Cake

    Ingredients
    • 1 1/4 cup whole cane sugar
    • ½ cup virgin coconut oil
    • 2 eggs
    • 1 teaspoon vanilla
    • 2 cups Bob’s Red Mill Gluten-free all purpose flour
    • 1 tsp xanthan gum
    • 1/4 teaspoon baking powder
    • 3/4 teaspoon baking soda
    • 3/4 teaspoon salt
    • 1/4 cup buttermilk
    • 1 cup, about 3 bananas, mashed
    • 3/4 cup chopped toasted almonds
    • 1/2 cup shredded coconut 
    • 1 recipe Chocolate Almond Ganache filling (recipe follows
    Directions
    1. Preheat oven to 325. Grease and flour a 13 by 9 baking pan. (You can also bake in two 9-inch cake pans if preferred.)
    2. Cream sugar with coconut oil (remember to measure in liquid state!) until well combined. Mixture will look thick, and creamy yellow. Add the eggs and vanilla, and continue to mix until fluffy.
    3. Combine dry ingredients in a bowl and whisk to mix. Mash up bananas and add to buttermilk.
    4. Reduce mixer speed to low, and add in dry ingredients alternately with buttermilk and bananas. Start with flour mixture, then buttermilk mixture, and end with the flour mixture. Stir in chopped toasted almonds and shredded coconut. 
    5. Pour into baking pan and bake for about 40 minutes, or until toothpick inserted in center of cake comes out clean. Cool completely on wire rack.
    6. Run a knife around the edges of the pan. Cut cake into half cross-wise. Remove the two halves from the cake pan and then slice each half of the cake into half horizontally. Spread about 2/3 cup of the ganache filling on top of one layer of the cake, top with another layer, and repeat this with the next layer, finishing the cake by topping off with a last layer of cake. Enjoy!!
    I love how the almonds look atop the ganache before being stirred in.

    Chocolate Almond Ganache Filling
    Makes 2 cups

    Ingredients
    ·        ½ cup of almonds
    ·        8 oz bittersweet or dark chocolate, chopped
    ·        1 cup heavy cream
    ·        2 Tbsp amaretto
    ·        1 tsp vanilla extract

     Directions: 
    1. Spread almonds on a baking sheet and toast in 350F oven for about 5-7 minutes, until fragrant. Cool completely and then chop into medium-fine pieces.
    2. Add chopped chocolate to food processor and process until fine.
    3. In a heavy small saucepan or pot, scald the heavy cream (heat to boiling point, watch for small bubbles forming around the edge of the pot).
    4. With the motor of the food processor running, pour the cream through the feeding tube in a steady stream. Process until smooth, then pulse in the amaretto and vanilla extract. 
    5. Scrape ganache into a glass bowl, stir in the chopped almonds and allow to cool for an hour. Cover the bowl and cool for several hours, or until it reaches a soft frosting consistency.


    March 2, 2011

    Two ways to pecan


    So I was burrowing through the fridge, weeding out unintentional “science experiments” and gathering up candidates for the big “leftovers medley” when I chanced upon an unopened bag of pecans. I must have bought it thinking I would use it, but didn’t. What to do now? ---

    I went burrowing through my pile of to-be-organized recipes, and came up with: “rustic maple pecan cookies” by Carole Walter, a gluten-free “Pecan Sandies” recipe from "Incredible Edible Gluten-Free Food for Kids" and a Brussels sprouts recipe that included buttered pecans (yum!). I have made the first two recipes but not the last, as the Brussels sprouts season may be over (they can be harvested through June in some places though, so I am going to keep my eyes open!).

    The Carole Walter recipe can be found here. I did not make any changes, but I did not have imitation maple extract and did not want to get any, so I increased the vanilla extract to 11/2 teaspoon, and added another ½ tsp of the Fiori de Sicilia extract from King Arthur Flour. Note that if you bake these cookies with your windows thrown open you will soon have neighbors knocking your door down! They smell divine, and taste delicious! Another thing I will change when I make it next time is to toast the pecans before hand, to enhance the flavor of the cookie.


    I was happy to discover the Pecan Sandies recipe. I have friends who need to eat gluten-free and most times when I have them over I reach for the Pamela Product’s Chocolate Chip Cookie mix. They are very good indeed and I always stock up on them so we eat them not infrequently ourselves. Still, it is nice to be able to make something different from time to time. I had my friend K in mind when I made these cookies, which from the sound of the recipe, resemble Pecan Crescent cookies. Well, these turned out much better than I had expected! The ingredients are simple and the process pretty straight-forward too. The dough does seem to be rather wet and sticky, so I had to re-flour my hands with rice flour every time after I finish shaping one cookie. The recipe called for the cookies to be shaped into elongated balls but I decided to make them crescent shaped instead. The cookies spread out quite a bit during baking and became flatter. They are also rather fragile, so when I picked them up and tossed them in powder sugar, bits and pieces kept breaking off, so I kept eating them- yeah, they were scrumptious! For the second batch of cookies, I decided to leave the cookies on the baking sheet and dust them over with powdered sugar instead, and then left them to cool completely on the cookie sheet. That worked better!

    I did feel the cookies were a bit grainy, though I guess that is why they are called “sandies”! No one else complained about the texture though! I gave K a tin of the cookies and she thought they were simply delicious. My picky husband also thought them good and the texture was fine by him. The girls wished there were more of the cookies. One said to the other, “Mmmmmmm, these were made in heaven!” and the other replied, “Mom made them in heaven!” I hope you will enjoy this recipe as well!


     Gluten-free egg-free Pecan Sandies
    adapted from "Incredible Edible Gluten-Free Food for Kids"

    Ingredients
    • 1 cup butter
    • 1/2 cup sugar
    • 1 Tablespoon water
    • 1 teaspoon vanilla
    • 1 cup rice flour
    • 2/3 cup potato starch flour
    • 1/3 cup tapioca flour
    • 1 cup chopped pecans (I recommend toasting them first)
    • 1 cup sifted powdered sugar 
    Directions
    1. Preheat oven to 325 F. Place rack in middle of oven.
    2. Beat butter until soft, then gradually add the sugar, beating until light and creamy. Blend in the water and vanilla.
    3. In another bowl combine the flours with the chopped pecans.
    4. Add flour mixture gradually to the creamed mixture. Mix well between additions.
    5. With lightly rice-floured hands, shape one-inch size balls of dough into crescent shapes, flattening a little. Place them at least one-inch apart on ungreased cookie sheet.
    6. Bake cookies in oven for 25-30 minutes, until very light brown. Let cookies sit for 10 minutes on cookie sheet, then sift powdered sugar over the cookies.
    7. Let cookies cool completely on cookie sheet before carefully removing with spatula. 
    Make about 40 cookies.


    And before I sign off, can I tell you about the series of unfortunate events that occurred in my kitchen last Friday? First, my toddler decided she wanted to help with baking, and before I could say “one”, she had pushed her chair to the counter-top, grabbed one of the eggs (set out to warm to room temperature) and smacked it flat on the counter-top. The lemon pound cake I made nearly burned when I had to run out to help my husband, and when I opened the oven, I discovered some of the batter had managed to seep out of the bundt pan and cooked itself on the oven floor. While preparing to make dinner, I opened the freezer to have a chunk of frozen lamb fall to hit a glass bowl of egg whites (fridge door was open as well and the glass bowl was close to the front) and shatter the bowl. There goes more macaroons, and another glass bowl! Dinner was late, with many interruptions from my toddler and during dinner, after three big gulps of red wine I announced that the kitchen gods wanted me to stop cooking, so I will not even boil water the following day! And with the trend of things, perhaps if I tried to toast a bagel I will manage to set our entire street on fire. And indeed I did not cook at all on Saturday! That was a bit long, but I thought some of you may commiserate! Share your kitchen disasters, if you will!