April 14, 2011

Supreme Pineapple-ginger Fried Rice

Fried rice is a great way to use up leftovers: rice, vegetables, meats, everything. Have some roasted asparagus in the fridge? Chop them up and toss them in. Got a few shrimps left over from Monday? Into the skillet they go. Usually I round it out with some scrambled eggs, or throw in some shredded cabbage, or carrots. Or chopped celery.

But recently I did not want any use-up-the-leftovers fried rice. I wanted in particular something with pineapples and ginger in it. And I wanted to add the half-bag of shrimps I still have in the freezer. And luckily, I saw this fried rice video put out by Whole Foods and found the idea of adding a miso "slurry" in the end simply brilliant. And that chopped seaweed topping? Yummy. Reminded me of a seaweed fried rice I used to make often, I'll have to dig that recipe out and make it again! But back to this recipe, using miso in place of soy sauce adds a more nuanced flavor, depth and sweetness (that is not cloying) to the fried rice. It balanced out whatever bite or sourness from the pineapples perfectly. There is also just something in the flavor of miso that is hard to lay one's finger on- the mysterious umami. Try making this for friends and family without disclosing the secret ingredient and have fun watching them trying to figure out that special taste!

Pineapple-ginger fried rice, topped with seaweed (sliced nori sheets
 This recipe is based on one I found in Gourmet several years ago, and further inspired by the video-with-the-miso. I am not including instructions for cooking the long-grain white rice as I have learned that it is better to follow the instructions on your rice package (the rice-to-water ratio can vary quite a bit!). It is best to use rice that have sat in the fridge at least overnight, as this makes them dry out a little and absorb the flavors better, but I've also used rice cooked earlier in the afternoon with good results. You can also use brown rice if you want but I prefer white rice for this recipe.

Supreme Pineapple-ginger Fried Rice
serves about 6
  • 5 cups cooked long-grain white rice
  • 4 Tbsp vegetable oil
  • 3 Tbsp finely grated peeled fresh ginger
  • 5 scallions (white and pale green parts separated from the greens), finely chopped
  • 1/2 pound shrimps
  • 1 Tbsp soy sauce
  • 1 1/2 tsp salt
  • 3/4 cup diced (1/4-inch) cored peeled fresh pineapple
  • miso slurry: 2 Tbsp white miso paste "dissolved" in 1/4 cup hot (NOT boiling) water 
  • sliced seaweed (optional but recommended)
  1. Have your cooked rice ready. Prepare the shrimps if necessary: shell and de-vein. Place in a small bowl and sprinkle some ground white pepper and toss with a tablespoon of soy sauce.
  2. Heat a wok or 12-inch skillet over moderate heat until a drop of water vaporizes instantly. Pour oil around side of wok, then tilt wok to swirl oil, coating side. When oil just begins to smoke, stir-fry ginger, white and pale green parts of scallions, and salt until fragrant, about 1 minute. 
  3. Remove shrimps with a slotted spoon and add to the wok, and stir-fry till cooked through and pink.
  4. Crumble rice into wok and stir-fry, mixing all ingredients thoroughly. Have the miso slurry ready.
  5.  Turn off heat, then add scallion greens, diced pineapples, and toss quickly a few times. Then drizzle miso slurry over the entire mixture, and toss to combine. Taste and adjust seasoning, if needed.
  6. If desired, top with sliced seaweed (toasted nori sheets).

April 13, 2011

Wacky Cupcakes (GF, egg-free)

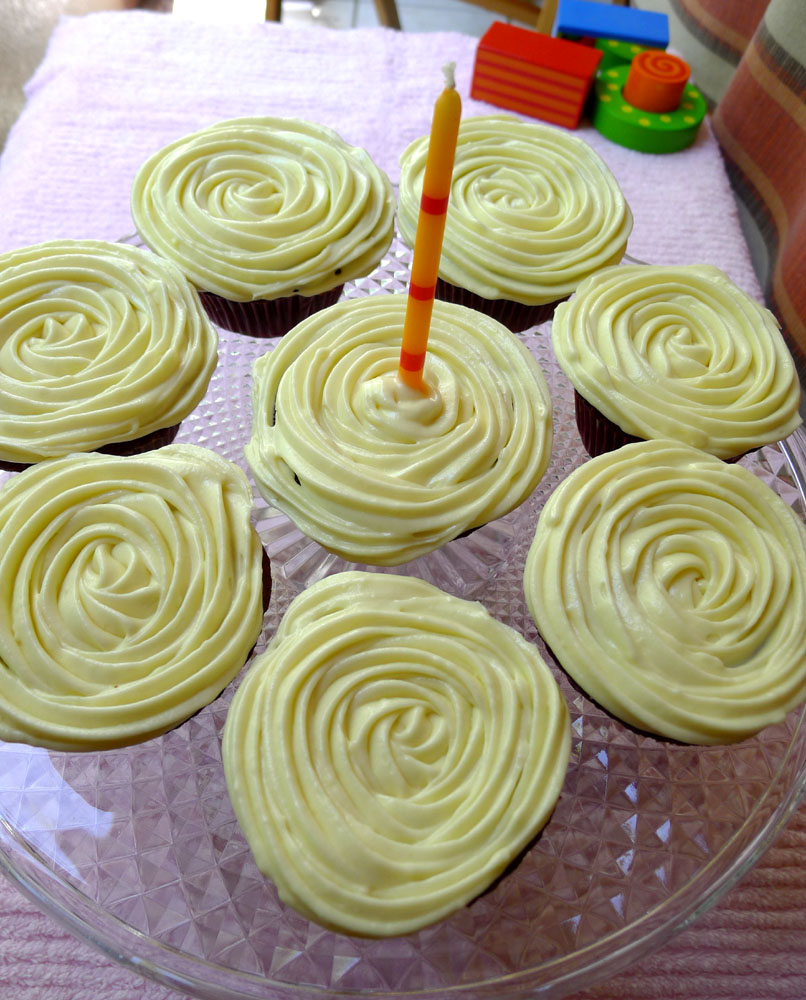
Gluten-free, egg-free chocolate cupcakes with ivory frosting
When my friend K's birthday was upcoming, I knew I wanted to bake her a cake she could enjoy without having to worry about allergens. I wanted to make it good, as I know the first birthday celebration without her dear mother will be tough. As I thumbed through the cookbooks my anxiety only raised as I did not really have time to test-drive the recipes and I did not want to serve her a mass of disaster in a bowl and hand her a spoon (even though she said that would be mighty fine by her).

So, imagine my joy and relief when I saw Jeanne (over at Art of Gluten-free Baking) had not only made a wacky cake recipe (one of the recipes I pondered, wondering if it would work with a GF baking mix), she had one that she had made frequently. FABULOUS! I knew I need looked no further! That was the recipe I settled on, though I used Bob's Red Mill's all-purpose gluten-free flour-mix and added xanthan gum. I also decided to use the Dreamy Creamy White Chocolate Frosting from Rose's Heavenly Cakes to decorate the cupcakes, thinking a contrasting ivory topping will make them look fun. The other reason why I settled on this frosting was because it did not require additional sugar.

I am happy to report that the birthday tea for K turned out really well this past Sunday, blessed with gluten-free, egg-free cupcakes that turned out delicious, with a dreamy frosting that was a cinch to make. I made the cupcakes and frosting together with V, making our "personal time" together all the more sweeter. And ever since I posted on Facebook this rose cake tutorial from i am baker, I had been dying to try it. I don't think my roses looked too shabby for a first try, don't you think? Of course, hers are far more superior, sniff~

Gluten-free, egg-free Wacky Cupcakes
original recipe from Art of Gluten-free Baking
Makes 12 cupcakes or one 8-inch square cake
  • 1 1/2 cups Bob's Red Mill all-purpose gluten-free baking mix*
  • 3/4 tsp xanthan gum
  • 1 cup  granulated sugar
  • 3 Tbsp unsweetened cocoa, sifted
  • 1/2 tsp salt
  • 1 tsp baking soda
  • 1 tsp baking powder
  • 6 Tbsp rice bran oil (or other neutral-flavored vegetable oil)
  • 1 Tbsp apple cider vinegar
  • 1 tsp vanilla extract
  • 1 cup cold milk (or you can use cold water, or coffee)
  1. Pre-heat oven to 350F.
  2. Stir together dry ingredients in large mixing bowl (or you can do as Jeanne did, and do it directly in an 8" square cake pan. I used a mixing bowl since I was making cupcakes). 
  3. Make three depressions (or wells) in the flour mixture, 2 small and 1 large.
  4. Pour your oil into the biggest well, and the vanilla and vinegar into the 2 smaller wells.
  5. Pour the cold milk (or liquid of choice) over it all, and mix well gently.
  6. Portion batter (it's rather watery) out into the muffin tins. (I poured the batter into a large measuring cup and poured from there, much easier.) If you are using square pan just smooth out the top.
  7. Bake cupcakes for 30 minutes, until tester comes out clean. The square cake may need 5-10 minutes more, check with tester, which should come out clean. Let cool completely on wire rack. Frost if desired, and enjoy!
* Scroll to the bottom of this page for alternative GF flour mixtures. There is a rice-free one, and another using bean flours.

Dreamy Creamy White Chocolate Frosting
Recipe from  Rose's Heavenly Cakes
Makes 2 3/4 cups frosting, enough to frost 12 cupcakes
  • 9 oz white chocolate that contains cocoa butter
  • 12 oz cream cheese, softened but still cool (about 65F)
  • 6 Tbsp (3/4 stick) unsalted butter, softened but still cool (about 65F)
  • 1 1/2 Tbsp sour cream
  1. In a double-boiler, heat the white chocolate over hot, but not simmering water, stirring often (I used a bowl over a pot since I do not own a double boiler. You can also use the microwave but I do not recommend using one for health reasons.) The white chocolate should be almost completely melted when you remove it from the heat. Stir to completely melt the chocolate.
  2. Let white chocolate cool until no longer warm to the touch but is still fluid.
  3. In a food processor, process the cream cheese, unsalted butter and sour cream until smooth and creamy. Scrap down the sides then add the cooled melted white chocolate. Pulse until completely incorporated.
  4. Frosting will become more firm in the refrigerator.

April 11, 2011

Gloriously garlicky chicken drumsticks

This past weekend was a crazy one, lots of baking, washing and cooking. I made two different types of brownies, mango cakes, gluten-free egg-free wacky cupcakes for my friend K's birthday tea, a gluten-free shortbread that did not turn out, another gluten-free egg-free cookie that was meh, and I also made the most gloriously garlicky oven-roasted chicken drumsticks.

Now I only have one photo for this recipe, but not because it looked ugly or anything. I just was pressed for time. I have also always wanted to take some adorable pictures of garlic to go with this post, but the mango cakes got in the way. However, please do not let the fact that only a single photo accompanies this post to deter you from trying this recipe. I highly recommend it, as it is make-ahead, and the garlicky gooey sauce you get after roasting the drumsticks is literally gold. You will scrap it up and use it for another recipe, your only regret being there weren't more of it.

So, to cut to the chase, this is a recipe that I adapted off of Melissa Clark's In the Kitchen with A Good Appetite. It is from a recipe called "Not-my-grandma's Chicken with Lemon, Garlic, and Oregano." Now, Clark is a consummate chef and food writer, and she has a really great story that comes with this recipe. She makes you laugh and she makes you want to cook and eat. In fact, she makes you want to invite yourself over to her kitchen and stuff yourself silly. I doubled her recipe (her original serves two), ramped up the garlic, and executed a make-over on the preparation so it can be more hands-off for crazy busy days.

Now, before we get to the recipe, a few things about garlic. As we all know, it gives you stinky breath but is so good for you. You can find a ton of recipes online where garlic is used to cure almost everything. I like this page best, especially with the long list of those bad, bad things that garlic can kill or inhibit. And don't miss the author's recipe for a connoisseur’s garlic cocktail, it sounds absolutely alluring. Now, I feel I also need to point out two very important things about garlic. First, always remove the green shoots. I have come across discussion threads wherein this was heavily debated: to remove or not to remove? Some claims it makes no difference at all and a waste of time, while others beg to differ. I am in the "remove" camp.I have not really made any bad experiences with it, but my instinct tells me they ought to be removed. In fact, when I have time (who am I kidding here?) I always remove the shoots, even if they are not green. Something just tells me they are not to be included. And apparently, folks over at Cook's Illustrated had made a test cooking with the green shoots included and reported a bitter metallic taste aftertaste. 

On to some other things about garlic. Garlic contains many valuable phytochemicals with therapeutic effects. However it has been found that the anticancer phytochemicals do not stand up to heat: one minute in the microwave or 45 minutes in the oven (temperature not specified) resulted in complete loss of anti-cancer activities (summary to this research is here). But what is interesting is, when crushed garlic is allowed to stand for 10 minutes prior to heat treatment, some of the anti-cancer activity was retained. I remember being told some years ago by a foodie friend that is is best to mince the garlic and let them stand for about 10 minutes before using to allow crucial compounds to develop, and I guess this was what she meant. And there is a whole body of (mind-boggling) literature out there about how best to attain all the valuable components of garlic, since some of these compounds are oil-soluble, and some water-soluble. In other words, bake it, steam it, use in stir-fry, use it in soup, use it raw, let it air out some, variety is the key.

And now, without further ado, the stinkin' good recipe. I have adapted it such that the garlic paste can be made in a small (5-cup) food processor. You can of course use your good ol' mortar and pestle. It may seem to be a lot of paste but like I mentioned before, you will feel you did not have enough of the cooked garlicky mess after the oven roasting. And if you sometimes buy the ready-peeled garlic cloves (as I do!), the approximately 20 cloves of garlic in this recipe weighs in at about 3 ounces (once I felt I just had to weigh them!).

Oven-roasted garlicky drumsticks
Gloriously garlicky chicken drumsticks
 with thanks to Melissa Clark for recipe inspiration
  • 10 chicken drumsticks 
  •  3 tsp sea-salt
  • freshly ground black pepper
  • rice bran oil
  • 20 large cloves of garlic, about 3 oz
  • freshly squeezed juice of 2 lemons
  • 2 tsp dried oregano
  • a handful of fresh thyme
  1. Rinse chicken drumsticks and pat dry. Place drumsticks in large ziploc bag or a large bowl.
  2. Transfer garlic paste to a small bowl, and stir in the dried oregano.
  3. Scrap garlic mixture into ziploc bag (or bowl), throw in the sticks of fresh thyme (I do not bother to remove the leaves from the stems) and squeeze the juice of the two lemons right into ziploc bag (or bowl). Close the bag well and then massage the heavenly paste into the drumsticks, distributing the paste and wiping your drool. (If you prefer the bowl, just get in there with your clean hands and smear the paste all over the drumsticks, then cover bowl well and refrigerate.) Refrigerate the bag until ready to use. (If you do this in the morning, like I do, try to massage the drumsticks, or turn them around every time you open the fridge.)
  4. Pre-heat oven to 450F. Remove drumsticks and place on a baking pan. Remember to scrap out all the garlic paste into the pan. Sprinkle with more black pepper if desired. Drizzle with a little rice bran oil (or if you have to use olive oil, I suggest mixing it with rice bran oil to raise the smoking point).
  5. Roast for 15 minutes. Remove pan and with tongs flip the drumsticks over. I like to tilt up one end of the pan so the garlicky juice flows to one corner so I can dip the drumsticks in that golden goodness. Lower oven heat to 400F and continue to roast about another 15 minutes more, until browned and golden.
  6. Enjoy, and after dinner scoop up that garlicky goodness at the bottom of the pan and keep it in a sealed glass container. You can use it for many things. You can toss it with rice noodles and serve with a crunchy salad. Once I stir-fried pea shoots with it and it was totally scrumptious. I am thinking you can steam spinach and then toss it with this garlicky oil. Oh, and once we even dipped our toasted sourdough bread in this garlicky mess, and boy, that was good too!
I am thinking this could work with a baked tofu recipe as well, but probably not with as much garlic! It may even work with potatoes, but I have a skillet-roasted potato recipes that is also pretty hands-off and involves garlic, but that would be another post for another day!